
Citrix XenApp/XenDesktop 7.13 Upgrade VDA using PVS
- David Hammett

- Dec 4, 2017
- 3 min read
Citrix XenApp and XenDesktop can be upgraded, but must be done in a particular order to avoid downtime.
Prepare - run site checks, backup databases, check Subscription Advantage date, close apps and console and check permissions.
Upgrade License server
Upgrade StoreFront
Upgrade Director
Upgrade Provisioning Services servers and Target Device software
Upgrade half the Delivery Controllers
Upgrade Studio
Upgrade XenApp/XenDesktop databases
Upgrade remaining Delivery Controllers
Upgrade Virtual Delivery Agents (VDA)
Update machine catalog and delivery groups
The following article goes through the steps of upgrading the Citrix XenApp/XenDesktop 7.13 Virtual Delivery Agent on a Windows 10 machine that boots from Provisioning Services.

On the Provisioning Server, open the Provisioning Services Console, enter the PVS server name in Name and click Connect.

Expand farm name > Sites > site name > vDisk Pool.

Right click on vDisk and select Versions...

In vDisk Versions window click New to create a new maintenance version.

Click Done.

Log into vSphere Web Client or vSphere Client to power up the VM used to update the master image.

Click on VMs and Templates.

Locate the VM.

Right click and select Power > Power On.
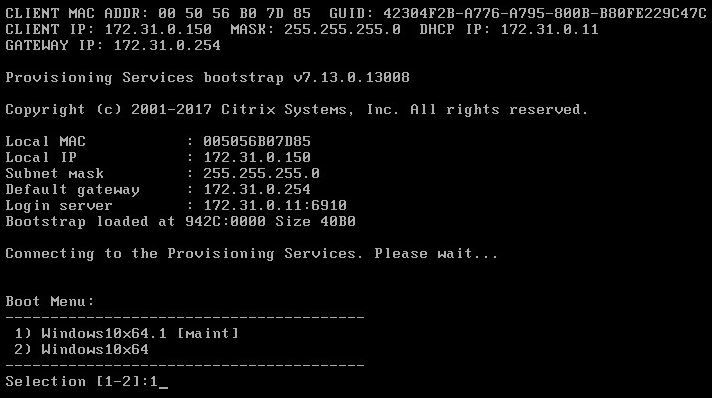
On the master image VM console select 1 to boot it from the maintenance version created earlier. If you have the SkipBootMenu registry value on Provisioning Services you won't see this option and it will automatically boot-up into the maintenance version.

Back on the vSphere Web Client, mount the XenApp/XenDesktop 7.13 DVD in the master image VM.

Right click on the VM and click Edit Settings...

Click on the CD/DVD drive 1 drop-down box.

Select Datastore ISO File (assuming you have already uploaded the ISO to a datastore).

Browse the datastore and folders, select the ISO from the list and click OK.

Click Connect next to CD/DVD drive 1 and click OK.

On the master VM image you can now launch the VDA upgrade. Click on Virtual Delivery Agent for Windows Desktop OS under Upgrade Machines and Images.

Deselect Citrix Personalization for App-V - VDA, if you are not using Microsoft App-V to deploy applications and click Next.

Click Next.

Click Upgrade.
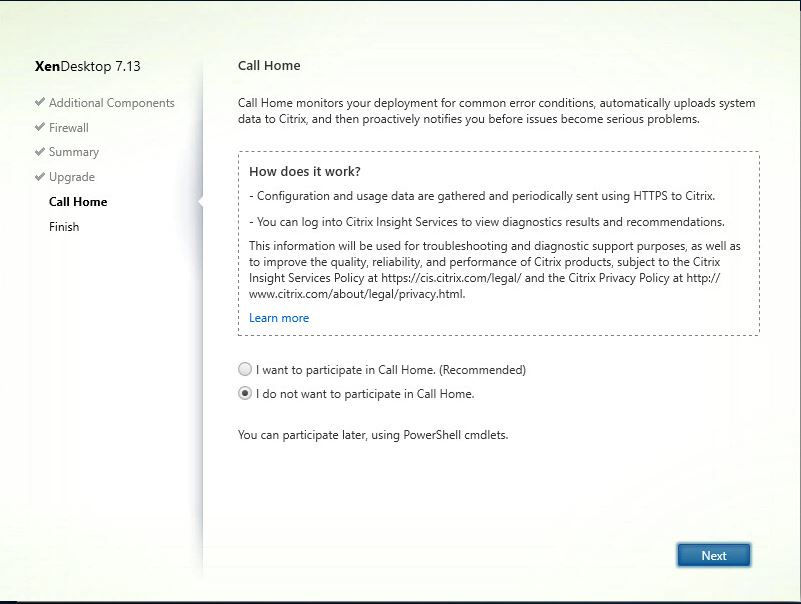
Select I do not want to participate in Call Home (unless you want to) and click Next.

Leave Restart machine selected and click Finish.

Enter 1 and press RETURN to boot it from PVS.

Now the VDA upgrade is successful the master VM image can be shutdown.

Back in the Provisioning Services Console.

Right click on the vDisk and click Versions...

Select the vDisk maintenance version from the list and click Promote.

Select either Test or Production and click OK to promote the vDisk version immediately. Alternatively you can select Scheduled and specify a date and time of when the vDisk version will be promoted.

The vDisk version should now have a green tick next to the version number to indicate that it has been promoted to production. If you select Test it will have a magnifying glass icon instead.
The Replication button has a warning icon on it to indicate that the vDisk version is only available on a single server.
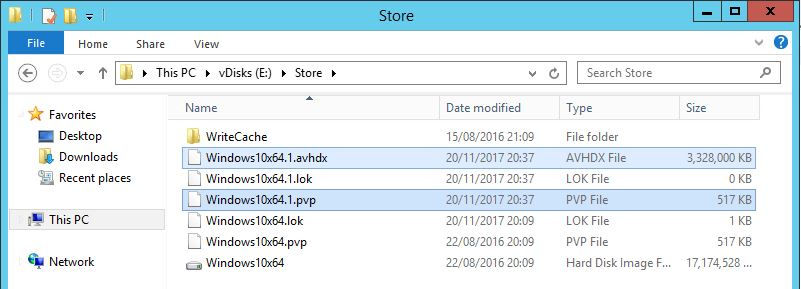
Select the PVP and AVHDX files that have the correct version number in the file name and copy the files. In this case they will end with .1.avhdx and .1.pvs.

Paste the files on to the storage volume containing the vDisks located on the second PVS server.

Click on Refresh.

The warning icon should now disappear. You can click on the Replication button to see the replication status.

All servers and vDisk version numbers should have a blue dot to indicate that it is present on both servers. Click Done.

Click Done.

That's it, next time the VM's boot-up they will use the updated Virtual Delivery Agent.


Comments