VMware vCenter Server 6.0 Configuring AD, Adding a Role and Granting User Access
By default VMware vCenter Server has its own local users for logging into vCenter Server to manage it and built-in roles granting specific privileges for those users. Users are unable to use their Active Directory credentials to log on to vSphere Web Client until the domain is configured on vCenter Server. This article goes through the steps of configuring Active Directory on vCenter server, adding a custom role with specific privileges and adding a user to vCenter Server.

Log on to vSphere Web Client using the administrator account created during the vCenter Server install.

Once logged in click on Administration.

Click Configuration under Single Sign-On.

Click on the + icon to add an identity source.

In Identity source type select Active Directory (Integrated Windows Authentication). Leave Domain name as is and leave Use machine account selected.

The Active Directory domain should now appear in the list.

Click on Roles under Access Control.

Enter the Role name; in this case we are creating a role specifically for use by XenDesktop to allow it to create virtual machines and power manage them.

Under Datastore select Allocate space, Browse datastore and Low level file operations.
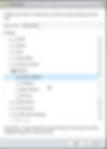
Select Assign network under Network.

Select Assign virtual machine to resource pool under Resource.

In Tasks select Create task.

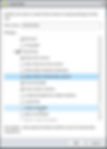
Select Add existing disk, Add new disk, Add or remove device, Advanced and Change CPU count under Virtual machine > Configuration.

Also under Virtual machine > Configuration select Change resource and Memory.

Modify device settings (only if you intend to use AppDisks), Remove disk and Settings.

Expand Virtual machine > Interactive.

Select Power Off, Power On, Reset and Suspend.

Expand Virtual machine > Inventory and select Create from existing, Create new, Register and Remove.
Select Allow disk access, Allow virtual machine files upload, Clone template and Clone virtual machine under Virtual machine > Provisioning.

Also select Deploy template and Mark as virtual machine.
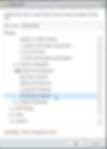
Expand Virtual machine > Snapshot management and select Create snapshot, Remove Snapshot and Revert to snapshot.

Optionally expand Global at the top.

Select Manage custom attributes and Set custom attribute and click OK.

Click on Home to go back to the home screen and click Hosts and Clusters.

Select the vCenter Server FQDN in the left-hand tree, click Manage tab and click Permissions.

Click the + icon to add a user or group at the root of vCenter Server.

In Assign Role select the custom role created earlier from the drop-down box.

Click Add.

In Domain select the Active Directory domain added earlier.

Select the user or group from the list, click Add and click OK.

Leave Propagate to children selected, so the permissions will spread to all the vCenter Server child objects and click OK.

That's it the user account now has access to vCenter Server and all virtual machines, clusters, resource pools, etc, but restricted to only the privileges granted in the custom role.